
Deploy the application
Estimated reading time: 10 minutesYou are viewing docs for legacy standalone Swarm. These topics describe standalone Docker Swarm. If you use Docker 1.12 or higher, Swarm mode is integrated with Docker Engine. Most users should use integrated Swarm mode — a good place to start is Getting started with swarm mode and Swarm mode CLI commands. Standalone Docker Swarm is not integrated into the Docker Engine API and CLI commands.
You’ve deployed the load balancer, the discovery backend, and a Swarm cluster so now you can build and deploy the voting application itself. You do this by starting a number of “Dockerized applications” running in containers.
The diagram below shows the final application configuration including the overlay
container network, voteapp.
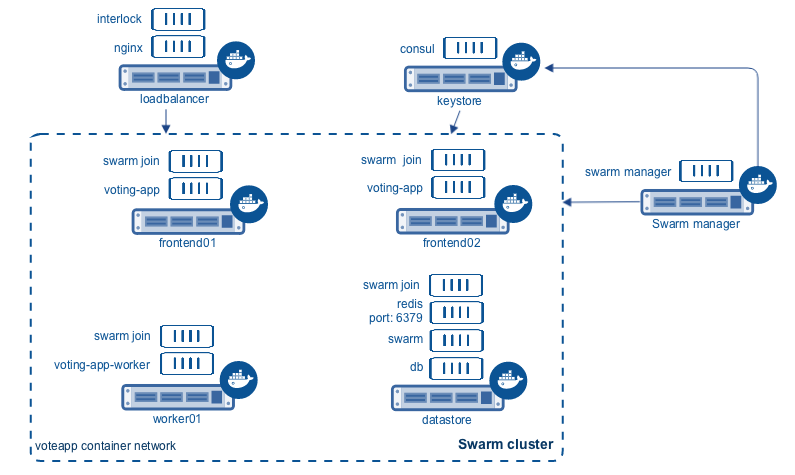
In this procedure you will connect containers to this network. The voteapp
network is available to all Docker hosts using the Consul discovery backend.
Notice that the interlock, nginx, consul, and swarm manager containers
on are not part of the voteapp overlay container network.
Task 1. Set up volume and network
This application relies on both an overlay container network and a container
volume. The Docker Engine provides these two features. You’ll create them both
on the Swarm manager instance.
-
Direct your local environment to the Swarm manager host.
$ eval $(docker-machine env manager)You can create the network on a cluster node at the network is visible on them all.
-
Create the
voteappcontainer network.$ docker network create -d overlay voteapp -
Switch to the db store.
$ eval $(docker-machine env dbstore) -
Verify you can see the new network from the dbstore node.
$ docker network ls NETWORK ID NAME DRIVER e952814f610a voteapp overlay 1f12c5e7bcc4 bridge bridge 3ca38e887cd8 none null 3da57c44586b host host -
Create a container volume called
db-data.$ docker volume create --name db-data
Task 2. Start the containerized microservices
At this point, you are ready to start the component microservices that make up the application. Some of the application’s containers are launched from existing images pulled directly from Docker Hub. Other containers are launched from custom images you must build. The list below shows which containers use custom images and which do not:
- Load balancer container: stock image (
ehazlett/interlock) - Redis containers: stock image (official
redisimage) - Postgres (PostgreSQL) containers: stock image (official
postgresimage) - Web containers: custom built image
- Worker containers: custom built image
- Results containers: custom built image
You can launch these containers from any host in the cluster using the commands
in this section. Each command includes a -H flag so that they execute against
the Swarm manager.
The commands also all use the -e flag which is a Swarm constraint. The
constraint tells the manager to look for a node with a matching function label.
You set established the labels when you created the nodes. As you run each
command below, look for the value constraint.
-
Start a Postgres database container.
$ docker -H $(docker-machine ip manager):3376 run -t -d \ -v db-data:/var/lib/postgresql/data \ -e constraint:com.function==dbstore \ --net="voteapp" \ --name db postgres:9.4 -
Start the Redis container.
$ docker -H $(docker-machine ip manager):3376 run -t -d \
-p 6379:6379 \
-e constraint:com.function==dbstore \
--net="voteapp" \
--name redis redis
The
redisname is important so don’t change it. -
Start the worker application
$ docker -H $(docker-machine ip manager):3376 run -t -d \ -e constraint:com.function==worker01 \ --net="voteapp" \ --net-alias=workers \ --name worker01 docker/example-voting-app-worker -
Start the results application.
$ docker -H $(docker-machine ip manager):3376 run -t -d \ -p 80:80 \ --label=interlock.hostname=results \ --label=interlock.domain=myenterprise.example.com \ -e constraint:com.function==dbstore \ --net="voteapp" \ --name results-app docker/example-voting-app-result-app -
Start the voting application twice; once on each frontend node.
$ docker -H $(docker-machine ip manager):3376 run -t -d \
-p 80:80 \
--label=interlock.hostname=vote \
--label=interlock.domain=myenterprise.example.com \
-e constraint:com.function==frontend01 \
--net="voteapp" \
--name voting-app01 docker/example-voting-app-voting-app
And again on the other frontend node.
$ docker -H $(docker-machine ip manager):3376 run -t -d \
-p 80:80 \
--label=interlock.hostname=vote \
--label=interlock.domain=myenterprise.example.com \
-e constraint:com.function==frontend02 \
--net="voteapp" \
--name voting-app02 docker/example-voting-app-voting-app
Task 3. Check your work and update /etc/hosts
In this step, you check your work to make sure the Nginx configuration recorded
the containers correctly. You’ll update your local systems /etc/hosts file to
allow you to take advantage of the loadbalancer.
-
Change to the
loadbalancernode.$ eval $(docker-machine env loadbalancer) -
Check your work by reviewing the configuration of nginx.
$ docker exec interlock cat /etc/conf/nginx.conf
... output snipped ...

upstream results.myenterprise.example.com {
    zone results.myenterprise.example.com_backend 64k;

    server 192.168.99.111:80;

}
server {
    listen 80;

    server_name results.myenterprise.example.com;

    location / {
        proxy_pass http://results.myenterprise.example.com;
    }
}
upstream vote.myenterprise.example.com {
    zone vote.myenterprise.example.com_backend 64k;

    server 192.168.99.109:80;
    server 192.168.99.108:80;

}
server {
    listen 80;

    server_name vote.myenterprise.example.com;

    location / {
        proxy_pass http://vote.myenterprise.example.com;
    }
}

include /etc/conf/conf.d/*.conf;
}
The
http://vote.myenterprise.example.comsite configuration should point to either frontend node. Requests tohttp://results.myenterprise.example.comgo just to the singledbstorenode where theexample-voting-app-result-appis running. -
On your local host, edit
/etc/hostsfile add the resolution for both these sites. -
Save and close the
/etc/hostsfile. -
Restart the
nginxcontainer.Manual restart is required because the current Interlock server is not forcing an Nginx configuration reload.
$ docker restart nginx
Task 4. Test the application
Now, you can test your application.
-
Open a browser and navigate to the
http://vote.myenterprise.example.comsite.You should see something similar to the following:
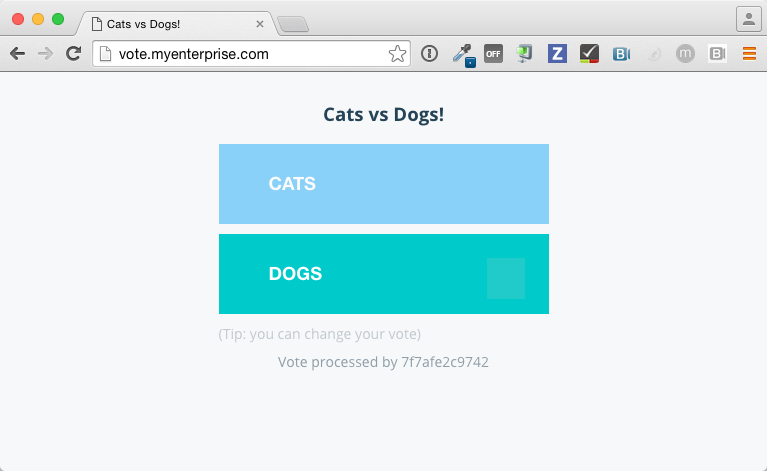
- Click on one of the two voting options.
- Navigate to the
http://results.myenterprise.example.comsite to see the results. -
Try changing your vote.
You’ll see both sides change as you switch your vote.
Extra Credit: Deployment with Docker Compose
Up to this point, you’ve deployed each application container individually. This can be cumbersome especially because their are several different containers and starting them is order dependent. For example, that database should be running before the worker.
Docker Compose let’s you define your microservice containers and their dependencies in a Compose file. Then, you can use the Compose file to start all the containers at once. This extra credit
-
Before you begin, stop all the containers you started.
a. Set the host to the manager.
$ DOCKER_HOST=$(docker-machine ip manager):3376b. List all the application containers on the Swarm.
c. Stop and remove each container.
-
Try to create Compose file on your own by reviewing the tasks in this tutorial.
The version 2 Compose file format is the best to use. Translate each
docker runcommand into a service in thedocker-compose.ymlfile. For example, this command:$ docker -H $(docker-machine ip manager):3376 run -t -d \ -e constraint:com.function==worker01 \ --net="voteapp" \ --net-alias=workers \ --name worker01 docker/example-voting-app-workerBecomes this in a Compose file.
worker:
  image: docker/example-voting-app-worker
  networks:
    voteapp:
      aliases:
      - workers
In general, Compose starts services in reverse order they appear in the file. So, if you want a service to start before all the others, make it the last service in the file. This application relies on a volume and a network, declare those at the bottom of the file.
-
Check your work against this file.
-
When you are satisfied, save the
docker-compose.ymlfile to your system. -
Set
DOCKER_HOSTto the Swarm manager.$ DOCKER_HOST=$(docker-machine ip manager):3376 -
In the same directory as your
docker-compose.ymlfile, start the services.$ docker-compose up -d Creating network "scale_voteapp" with the default driver Creating volume "scale_db-data" with default driver Pulling db (postgres:9.4)... worker01: Pulling postgres:9.4... : downloaded dbstore: Pulling postgres:9.4... : downloaded frontend01: Pulling postgres:9.4... : downloaded frontend02: Pulling postgres:9.4... : downloaded Creating db Pulling redis (redis:latest)... dbstore: Pulling redis:latest... : downloaded frontend01: Pulling redis:latest... : downloaded frontend02: Pulling redis:latest... : downloaded worker01: Pulling redis:latest... : downloaded Creating redis Pulling worker (docker/example-voting-app-worker:latest)... dbstore: Pulling docker/example-voting-app-worker:latest... : downloaded frontend01: Pulling docker/example-voting-app-worker:latest... : downloaded frontend02: Pulling docker/example-voting-app-worker:latest... : downloaded worker01: Pulling docker/example-voting-app-worker:latest... : downloaded Creating scale_worker_1 Pulling voting-app (docker/example-voting-app-voting-app:latest)... dbstore: Pulling docker/example-voting-app-voting-app:latest... : downloaded frontend01: Pulling docker/example-voting-app-voting-app:latest... : downloaded frontend02: Pulling docker/example-voting-app-voting-app:latest... : downloaded worker01: Pulling docker/example-voting-app-voting-app:latest... : downloaded Creating scale_voting-app_1 Pulling result-app (docker/example-voting-app-result-app:latest)... dbstore: Pulling docker/example-voting-app-result-app:latest... : downloaded frontend01: Pulling docker/example-voting-app-result-app:latest... : downloaded frontend02: Pulling docker/example-voting-app-result-app:latest... : downloaded worker01: Pulling docker/example-voting-app-result-app:latest... : downloaded Creating scale_result-app_1 -
Use the
docker pscommand to see the containers on the Swarm cluster.$ docker -H $(docker-machine ip manager):3376 ps CONTAINER ID IMAGE COMMAND CREATED STATUS PORTS NAMES b71555033caa docker/example-voting-app-result-app "node server.js" 6 seconds ago Up 4 seconds 192.168.99.104:32774->80/tcp frontend01/scale_result-app_1 cf29ea21475d docker/example-voting-app-worker "/usr/lib/jvm/java-7-" 6 seconds ago Up 4 seconds worker01/scale_worker_1 98414cd40ab9 redis "/entrypoint.sh redis" 7 seconds ago Up 5 seconds 192.168.99.105:32774->6379/tcp frontend02/redis 1f214acb77ae postgres:9.4 "/docker-entrypoint.s" 7 seconds ago Up 5 seconds 5432/tcp frontend01/db 1a4b8f7ce4a9 docker/example-voting-app-voting-app "python app.py" 7 seconds ago Up 5 seconds 192.168.99.107:32772->80/tcp dbstore/scale_voting-app_1When you started the services manually, you had a
voting-appinstances running on two frontend servers. How many do you have now? -
Scale your application up by adding some
voting-appinstances.$ docker-compose scale voting-app=3 Creating and starting 2 ... done Creating and starting 3 ... doneAfter you scale up, list the containers on the cluster again.
-
Change to the
loadbalancernode.$ eval $(docker-machine env loadbalancer) -
Restart the Nginx server.
$ docker restart nginx -
Check your work again by visiting the
http://vote.myenterprise.example.comandhttp://results.myenterprise.example.comagain. -
You can view the logs on an individual container.
$ docker logs scale_voting-app_1
 * Running on http://0.0.0.0:80/ (Press CTRL+C to quit)
 * Restarting with stat
 * Debugger is active!
 * Debugger pin code: 285-809-660
192.168.99.103 - - [11/Apr/2016 17:15:44] "GET / HTTP/1.0" 200 -
192.168.99.103 - - [11/Apr/2016 17:15:44] "GET /static/stylesheets/style.css HTTP/1.0" 304 -
192.168.99.103 - - [11/Apr/2016 17:15:45] "GET /favicon.ico HTTP/1.0" 404 -
192.168.99.103 - - [11/Apr/2016 17:22:24] "POST / HTTP/1.0" 200 -
192.168.99.103 - - [11/Apr/2016 17:23:37] "POST / HTTP/1.0" 200 -
192.168.99.103 - - [11/Apr/2016 17:23:39] "POST / HTTP/1.0" 200 -
192.168.99.103 - - [11/Apr/2016 17:23:40] "POST / HTTP/1.0" 200 -
192.168.99.103 - - [11/Apr/2016 17:23:41] "POST / HTTP/1.0" 200 -
192.168.99.103 - - [11/Apr/2016 17:23:43] "POST / HTTP/1.0" 200 -
192.168.99.103 - - [11/Apr/2016 17:23:44] "POST / HTTP/1.0" 200 -
192.168.99.103 - - [11/Apr/2016 17:23:46] "POST / HTTP/1.0" 200 -
This log shows the activity on one of the active voting application containers.
Next steps
Congratulations. You have successfully walked through manually deploying a microservice-based application to a Swarm cluster. Of course, not every deployment goes smoothly. Now that you’ve learned how to successfully deploy an application at scale, you should learn what to consider when troubleshooting large applications running on a Swarm cluster.
 Feedback? Suggestions? Can't find something in the docs?
Edit this page ● Request docs changes ● Get support
Rate this page: