
Configure Docker Swarm for TLS
Estimated reading time: 17 minutesYou are viewing docs for legacy standalone Swarm. These topics describe standalone Docker Swarm. If you use Docker 1.12 or higher, Swarm mode is integrated with Docker Engine. Most users should use integrated Swarm mode — a good place to start is Getting started with swarm mode and Swarm mode CLI commands. Standalone Docker Swarm is not integrated into the Docker Engine API and CLI commands.
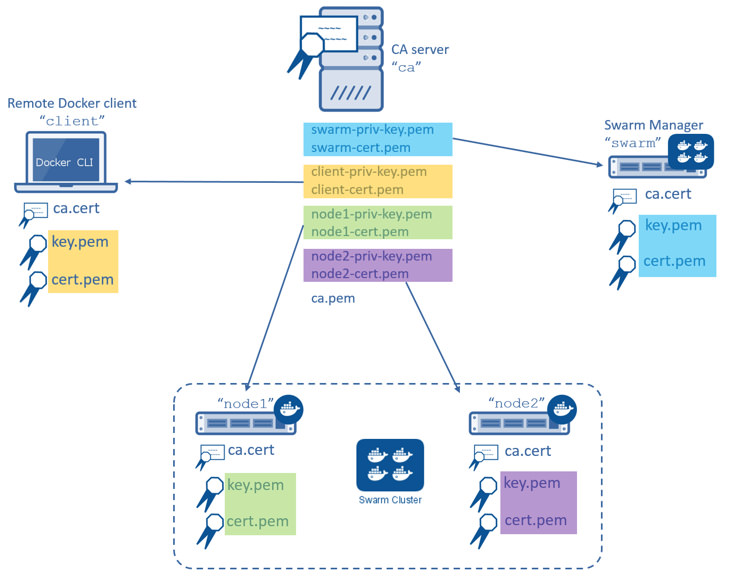
In this procedure you create a two-node Swarm cluster, a Docker Engine CLI, a
Swarm Manager, and a Certificate Authority as shown below. All the Docker Engine
hosts (client, swarm, node1, and node2) have a copy of the
CA’s certificate as well as their own key-pair signed by the CA.

You will complete the following steps in this procedure:
- Step 1: Set up the prerequisites
- Step 2: Create a Certificate Authority (CA) server
- Step 3: Create and sign keys
- Step 4: Install the keys
- Step 5: Configure the Engine daemon for TLS
- Step 6: Create a Swarm cluster
- Step 7: Create the Swarm Manager using TLS
- Step 8: Test the Swarm manager configuration
- Step 9: Configure the Engine CLI to use TLS
Before you begin
The article includes steps to create your own CA using OpenSSL. This is similar
to operating your own internal corporate CA and PKI. However, this must not
be used as a guide to building a production-worthy internal CA and PKI. These
steps are included for demonstration purposes only - so that readers without
access to an existing CA and set of certificates can follow along and configure
Docker Swarm to use TLS.
Step 1: Set up the prerequisites
To complete this procedure you must stand up 5 (five) Linux servers. These servers can be any mix of physical and virtual servers; they may be on premises or in the public cloud. The following table lists each server name and its purpose.
| Server name | Description |
|---|---|
ca |
Acts as the Certificate Authority (CA) server. |
swarm |
Acts as the Swarm Manager. |
node1 |
Act as a Swarm node. |
node2 |
Act as a Swarm node. |
client |
Acts as a remote Docker Engine client |
Make sure that you have SSH access to all 5 servers and that they can communicate with each other using DNS name resolution. In particular:
- Open TCP port 2376 between the Swarm Manager and Swarm nodes
- Open TCP port 3376 between the Docker Engine client and the Swarm Manager
You can choose different ports if these are already in use. This example assumes you use these ports though.
Each server must run an operating system compatible with Docker Engine. For simplicity, the steps that follow assume all servers are running Ubuntu 14.04 LTS.
Step 2: Create a Certificate Authority (CA) server
Note:If you already have access to a CA and certificates, and are comfortable working with them, you should skip this step and go to the next.
In this step, you configure a Linux server as a CA. You use this CA to create
and sign keys. This step included so that readers without access to an existing
CA (external or corporate) and certificates can follow along and complete the
later steps that require installing and using certificates. It is not
intended as a model for how to deploy production-worthy CA.
-
Logon to the terminal of your CA server and elevate to root.
$ sudo su -
Create a private key called
ca-priv-key.pemfor the CA:# openssl genrsa -out ca-priv-key.pem 2048 Generating RSA private key, 2048 bit long modulus ...........................................................+++ .....+++ e is 65537 (0x10001) -
Create a public key called
ca.pemfor the CA.The public key is based on the private key created in the previous step.
# openssl req -config /usr/lib/ssl/openssl.cnf -new -key ca-priv-key.pem -x509 -days 1825 -out ca.pem
You are about to be asked to enter information that will be incorporated
into your certificate request.
What you are about to enter is what is called a Distinguished Name or a DN.
There are quite a few fields but you can leave some blank
For some fields there will be a default value,
If you enter '.', the field will be left blank.
-----
Country Name (2 letter code) [AU]:US
<output truncated>
You have now configured a CA server with a public and private keypair. You can inspect the contents of each key. To inspect the private key:
# openssl rsa -in ca-priv-key.pem -noout -text
To inspect the public key (cert):
# openssl x509 -in ca.pem -noout -text
The following command shows the partial contents of the CA’s public key.
# openssl x509 -in ca.pem -noout -text
Certificate:
    Data:
        Version: 3 (0x2)
        Serial Number: 17432010264024107661 (0xf1eaf0f9f41eca8d)
    Signature Algorithm: sha256WithRSAEncryption
        Issuer: C=US, ST=CA, L=Sanfrancisco, O=Docker Inc
        Validity
            Not Before: Jan 16 18:28:12 2016 GMT
            Not After : Jan 13 18:28:12 2026 GMT
        Subject: C=US, ST=CA, L=San Francisco, O=Docker Inc
        Subject Public Key Info:
            Public Key Algorithm: rsaEncryption
                Public-Key: (2048 bit)
                Modulus:
                    00:d1:fe:6e:55:d4:93:fc:c9:8a:04:07:2d:ba:f0:
                    55:97:c5:2c:f5:d7:1d:6a:9b:f0:f0:55:6c:5d:90:
<output truncated>
Later, you’ll use this to certificate to sign keys for other servers in the infrastructure.
Step 3: Create and sign keys
Now that you have a working CA, you need to create key pairs for the Swarm Manager, Swarm nodes, and remote Docker Engine client. The commands and process to create key pairs is identical for all servers. You’ll create the following keys:
| Key | Description |
|---|---|
ca-priv-key.pem |
The CA’s private key and must be kept secure. It is used later to sign new keys for the other nodes in the environment. Together with the ca.pem file, this makes up the CA’s key pair. |
ca.pem |
The CA’s public key (also called certificate). This is installed on all nodes in the environment so that all nodes trust certificates signed by the CA. Together with the ca-priv-key.pem file, this makes up the CA’s key pair. |
NODE_NAME.csr |
A certificate signing request (CSR). A CSR is effectively an application to the CA to create a new key pair for a particular node. The CA takes the information provided in the CSR and generates the public and private key pair for that node. |
NODE_NAME-priv-key.pem |
A private key signed by the CA. The node uses this key to authenticate itself with remote Docker Engines. Together with the NODE_NAME-cert.pem file, this makes up a node’s key pair. |
NODE_NAME-cert.pem |
A certificate signed by the CA. This is not used in this example. Together with the NODE_NAME-priv-key.pem file, this makes up a node’s key pair. |
The commands below show how to create keys for all of your nodes. You perform this procedure in a working directory located on your CA server.
-
Logon to the terminal of your CA server and elevate to root.
$ sudo su -
Create a private key
swarm-priv-key.pemfor your Swarm Manager# openssl genrsa -out swarm-priv-key.pem 2048 Generating RSA private key, 2048 bit long modulus ............................................................+++ ........+++ e is 65537 (0x10001) -
Generate a certificate signing request (CSR)
swarm.csrusing the private key you create in the previous step.# openssl req -subj "/CN=swarm" -new -key swarm-priv-key.pem -out swarm.csrRemember, this is only for demonstration purposes. The process to create a CSR will be slightly different in real-world production environments.
-
Create the certificate
swarm-cert.pembased on the CSR created in the previous step.# openssl x509 -req -days 1825 -in swarm.csr -CA ca.pem -CAkey ca-priv-key.pem -CAcreateserial -out swarm-cert.pem -extensions v3_req -extfile /usr/lib/ssl/openssl.cnf <snip> # openssl rsa -in swarm-priv-key.pem -out swarm-priv-key.pemYou now have a keypair for the Swarm Manager.
-
Repeat the steps above for the remaining nodes in your infrastructure (
node1,node2, andclient).Remember to replace the
swarmspecific values with the values relevant to the node you are creating the key pair for.Server name Private key CSR Certificate node1node1-priv-key.pemnode1.csrnode1-cert.pemnode2node2-priv-key.pemnode2.csrnode2-cert.pemclientclient-priv-key.pemclient.csrclient-cert.pem -
Verify that your working directory contains the following files:
# ls -l
total 64
-rw-r--r-- 1 root   root   1679 Jan 16 18:27 ca-priv-key.pem
-rw-r--r-- 1 root   root   1229 Jan 16 18:28 ca.pem
-rw-r--r-- 1 root   root     17 Jan 18 09:56 ca.srl
-rw-r--r-- 1 root   root   1086 Jan 18 09:56 client-cert.pem
-rw-r--r-- 1 root   root    887 Jan 18 09:55 client.csr
-rw-r--r-- 1 root   root   1679 Jan 18 09:56 client-priv-key.pem
-rw-r--r-- 1 root   root   1082 Jan 18 09:44 node1-cert.pem
-rw-r--r-- 1 root   root    887 Jan 18 09:43 node1.csr
-rw-r--r-- 1 root   root   1675 Jan 18 09:44 node1-priv-key.pem
-rw-r--r-- 1 root   root   1082 Jan 18 09:49 node2-cert.pem
-rw-r--r-- 1 root   root    887 Jan 18 09:49 node2.csr
-rw-r--r-- 1 root   root   1675 Jan 18 09:49 node2-priv-key.pem
-rw-r--r-- 1 root   root   1082 Jan 18 09:42 swarm-cert.pem
-rw-r--r-- 1 root   root    887 Jan 18 09:41 swarm.csr
-rw-r--r-- 1 root   root   1679 Jan 18 09:42 swarm-priv-key.pem
You can inspect the contents of each of the keys. To inspect a private key:
openssl rsa -in <key-name> -noout -text
To inspect a public key (cert):
openssl x509 -in <key-name> -noout -text
The following commands shows the partial contents of the Swarm Manager’s public
swarm-cert.pem key.
# openssl x509 -in ca.pem -noout -text
Certificate:
Data:
    Version: 3 (0x2)
    Serial Number: 9590646456311914051 (0x8518d2237ad49e43)
Signature Algorithm: sha256WithRSAEncryption
    Issuer: C=US, ST=CA, L=Sanfrancisco, O=Docker Inc
    Validity
        Not Before: Jan 18 09:42:16 2016 GMT
        Not After : Jan 15 09:42:16 2026 GMT
    Subject: CN=swarm

<output truncated>
Step 4: Install the keys
In this step, you install the keys on the relevant servers in the infrastructure. Each server needs three files:
- A copy of the Certificate Authority’s public key (
ca.pem) - It’s own private key
- It’s own public key (cert)
The procedure below shows you how to copy these files from the CA server to each
server using scp. As part of the copy procedure, you’ll rename each file as
follows on each node:
| Original name | Copied name |
|---|---|
ca.pem |
ca.pem |
<server>-cert.pem |
cert.pem |
<server>-priv-key.pem |
key.pem |
-
Logon to the terminal of your CA server and elevate to root.
$ sudo su -
Create a
~/.certsdirectory on the Swarm manager. Here we assume user account is ubuntu.$ ssh ubuntu@swarm 'mkdir -p /home/ubuntu/.certs' -
Copy the keys from the CA to the Swarm Manager server.
$ scp ./ca.pem ubuntu@swarm:/home/ubuntu/.certs/ca.pem $ scp ./swarm-cert.pem ubuntu@swarm:/home/ubuntu/.certs/cert.pem $ scp ./swarm-priv-key.pem ubuntu@swarm:/home/ubuntu/.certs/key.pemNote: You may need to provide authentication for the
scpcommands to work. For example, AWS EC2 instances use certificate-based authentication. To copy the files to an EC2 instance associated with a public key callednigel.pem, modify thescpcommand as follows:scp -i /path/to/nigel.pem ./ca.pem ubuntu@swarm:/home/ubuntu/.certs/ca.pem. -
Repeat step 2 for each remaining server in the infrastructure.
node1node2client
-
Verify your work.
When the copying is complete, each machine should have the following keys.
Each node in your infrastructure should have the following files in the
/home/ubuntu/.certs/directory:# ls -l /home/ubuntu/.certs/ total 16 -rw-r--r-- 1 ubuntu ubuntu 1229 Jan 18 10:03 ca.pem -rw-r--r-- 1 ubuntu ubuntu 1082 Jan 18 10:06 cert.pem -rw-r--r-- 1 ubuntu ubuntu 1679 Jan 18 10:06 key.pem
Step 5: Configure the Engine daemon for TLS
In the last step, you created and installed the necessary keys on each of your Swarm nodes. In this step, you configure them to listen on the network and only accept connections using TLS. Once you complete this step, your Swarm nodes will listen on TCP port 2376, and only accept connections using TLS.
On node1 and node2 (your Swarm nodes), do the following:
-
Open a terminal on
node1and elevate to root.$ sudo su -
Edit Docker Engine configuration file.
If you are following along with these instructions and using Ubuntu 14.04 LTS, the configuration file is
/etc/default/docker. The Docker Engine configuration file may be different depending on the Linux distribution you are using. -
Add the following options to the
DOCKER_OPTSline.-H tcp://0.0.0.0:2376 --tlsverify --tlscacert=/home/ubuntu/.certs/ca.pem --tlscert=/home/ubuntu/.certs/cert.pem --tlskey=/home/ubuntu/.certs/key.pem -
Restart the Docker Engine daemon.
$ service docker restart -
Repeat the procedure on
node2as well.
Step 6: Create a Swarm cluster
Next create a Swarm cluster. In this procedure you create a two-node Swarm cluster using the default hosted discovery backend. The default hosted discovery backend uses Docker Hub and is not recommended for production use.
-
Logon to the terminal of your Swarm manager node.
-
Create the cluster and export it’s unique ID to the
TOKENenvironment variable.$ sudo export TOKEN=$(docker run --rm swarm create) Unable to find image 'swarm:latest' locally latest: Pulling from library/swarm d681c900c6e3: Pulling fs layer <snip> 986340ab62f0: Pull complete a9975e2cc0a3: Pull complete Digest: sha256:c21fd414b0488637b1f05f13a59b032a3f9da5d818d31da1a4ca98a84c0c781b Status: Downloaded newer image for swarm:latest -
Join
node1to the cluster.Be sure to specify TCP port
2376and not2375.$ sudo docker run -d swarm join --addr=node1:2376 token://$TOKEN 7bacc98536ed6b4200825ff6f4004940eb2cec891e1df71c6bbf20157c5f9761 -
Join
node2to the cluster.$ sudo docker run -d swarm join --addr=node2:2376 token://$TOKEN db3f49d397bad957202e91f0679ff84f526e74d6c5bf1b6734d834f5edcbca6c
Step 7: Start the Swarm Manager using TLS
-
Launch a new container with TLS enables
$ docker run -d -p 3376:3376 -v /home/ubuntu/.certs:/certs:ro swarm manage --tlsverify --tlscacert=/certs/ca.pem --tlscert=/certs/cert.pem --tlskey=/certs/key.pem --host=0.0.0.0:3376 token://$TOKENThe command above launches a new container based on the
swarmimage and it maps port3376on the server to port3376inside the container. This mapping ensures that Docker Engine commands sent to the host on port3376are passed on to port3376inside the container. The container runs the Swarmmanageprocess with the--tlsverify,--tlscacert,--tlscertand--tlskeyoptions specified. These options force TLS verification and specify the location of the Swarm manager’s TLS keys. -
Run a
docker pscommand to verify that your Swarm manager container is up and running.$ docker ps CONTAINER ID IMAGE COMMAND CREATED STATUS PORTS NAMES 035dbf57b26e swarm "/swarm manage --tlsv" 7 seconds ago Up 7 seconds 2375/tcp, 0.0.0.0:3376->3376/tcp compassionate_lovelace
Your Swarm cluster is now configured to use TLS.
Step 8: Test the Swarm manager configuration
Now that you have a Swarm cluster built and configured to use TLS, you’ll test that it works with a Docker Engine CLI.
-
Open a terminal onto your
clientserver. -
Issue the
docker versioncommand.When issuing the command, you must pass it the location of the clients certifications.
 $ sudo docker --tlsverify --tlscacert=/home/ubuntu/.certs/ca.pem --tlscert=/home/ubuntu/.certs/cert.pem --tlskey=/home/ubuntu/.certs/key.pem -H swarm:3376 version
 Client:
  Version:      1.9.1
  API version:  1.21
  Go version:   go1.4.2
  Git commit:   a34a1d5
  Built:        Fri Nov 20 13:12:04 UTC 2015
  OS/Arch:      linux/amd64

 Server:
  Version:      swarm/1.0.1
  API version:  1.21
  Go version:   go1.5.2
  Git commit:   744e3a3
  Built:
  OS/Arch:      linux/amd64
The output above shows the
Serverversion as “swarm/1.0.1”. This means that the command was successfully issued against the Swarm manager. -
Verify that the same command does not work without TLS.
This time, do not pass your certs to the Swarm manager.
$ sudo docker -H swarm:3376 version
:
 Version:      1.9.1
 API version:  1.21
 Go version:   go1.4.2
 Git commit:   a34a1d5
 Built:        Fri Nov 20 13:12:04 UTC 2015
 OS/Arch:      linux/amd64
Get http://swarm:3376/v1.21/version: malformed HTTP response "\x15\x03\x01\x00\x02\x02".
* Are you trying to connect to a TLS-enabled daemon without TLS?
The output above shows that the command was rejected by the server. This is because the server (Swarm manager) is configured to only accept connections from authenticated clients using TLS.
Step 9: Configure the Engine CLI to use TLS
You can configure the Engine so that you don’t have to pass the TLS options when
you issue a command. To do this, you’ll configure the Docker Engine host and
TLS settings as defaults on your Docker Engine client.
To do this, you place the client’s keys in your ~/.docker configuration folder. If you have other users on your system using the Engine command line, you’ll need to configure their account’s ~/.docker as well. The procedure below shows how to do this for the ubuntu user on
your Docker Engine client.
-
Open a terminal onto your
clientserver. -
If it doesn’t exist, create a
.dockerdirectory in theubuntuuser’s home directory.$ mkdir /home/ubuntu/.docker -
Copy the Docker Engine client’s keys from
/home/ubuntu/.certsto/home/ubuntu/.docker$ cp /home/ubuntu/.certs/{ca,cert,key}.pem /home/ubuntu/.docker -
Edit the account’s
~/.bash_profile. -
Set the following variables:
Variable Description DOCKER_HOSTSets the Docker host and TCP port to send all Engine commands to. DOCKER_TLS_VERIFYTells Engine to use TLS. DOCKER_CERT_PATHSpecifies the location of TLS keys. For example:
export DOCKER_HOST=tcp://swarm:3376 export DOCKER_TLS_VERIFY=1 export DOCKER_CERT_PATH=/home/ubuntu/.docker/ -
Save and close the file.
-
Source the file to pick up the new variables.
$ source ~/.bash_profile -
Verify that the procedure worked by issuing a
docker versioncommand$ docker version Client: Version: 1.9.1 API version: 1.21 Go version: go1.4.2 Git commit: a34a1d5 Built: Fri Nov 20 13:12:04 UTC 2015 OS/Arch: linux/amd64 Server: Version: swarm/1.0.1 API version: 1.21 Go version: go1.5.2 Git commit: 744e3a3 Built: OS/Arch: linux/amd64The server portion of the output above command shows that your Docker client is issuing commands to the Swarm Manager and using TLS.
Congratulations! You have configured a Docker Swarm cluster to use TLS.
Related Information
 Feedback? Suggestions? Can't find something in the docs?
Edit this page ● Request docs changes ● Get support
Rate this page: