Amazon Web Services (AWS) EC2 example
Estimated reading time: 4 minutesFollow along with this example to create a Dockerized Amazon Web Services (AWS) EC2 instance.
Step 1. Sign up for AWS and configure credentials
-
If you are not already an AWS user, sign up for AWS to create an account and get root access to EC2 cloud computers.
If you have an Amazon account, you can use it as your root user account.
-
Create an IAM (Identity and Access Management) administrator user, an admin group, and a key pair associated with a region.
From the AWS menus, select Services > IAM to get started.
To create machines on AWS, you must supply two parameters:
-
an AWS Access Key ID
-
an AWS Secret Access Key
See the AWS documentation on Setting Up with Amazon EC2. Follow the steps for “Create an IAM User” and “Create a Key Pair”.
-
Step 2. Use Machine to create the instance
-
Optionally, create an AWS credential file.
You can create an
~/.aws/credentialsfile to hold your AWS keys so that you don’t have to type them every time you run thedocker-machine createcommand. Here is an example of a credentials file.[default] aws_access_key_id = AKID1234567890 aws_secret_access_key = MY-SECRET-KEY -
Run
docker-machine createwith theamazonec2driver, your keys, and a name for the new instance.Using a credentials file
If you specified your keys in a credentials file, this command looks like this to create an instance called
aws-sandbox:docker-machine create --driver amazonec2 aws-sandboxSpecifying keys at the command line
If you don’t have a credentials file, you can use the flags
--amazonec2-access-keyand--amazonec2-secret-keyon the command line:$ docker-machine create --driver amazonec2 --amazonec2-access-key AKI******* --amazonec2-secret-key 8T93C******* aws-sandboxSpecifying a region
By default, the driver creates new instances in region us-east-1 (North Virginia). You can specify a different region by using the
--amazonec2-regionflag. For example, this command creates a machine called “aws-01” in us-west-1 (Northern California).$ docker-machine create --driver amazonec2 --amazonec2-region us-west-1 aws-01 -
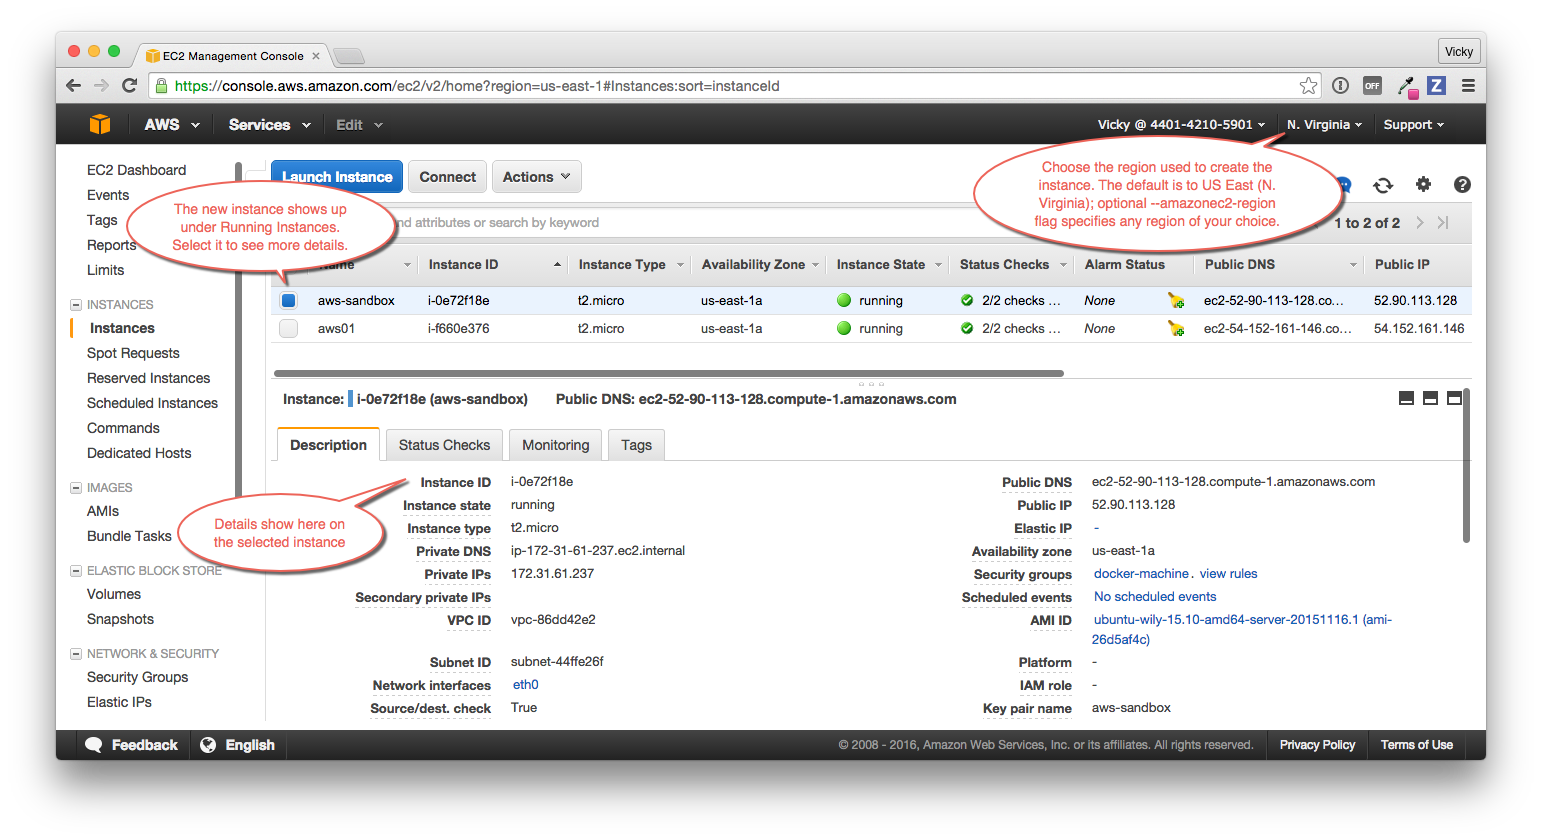
Go to the AWS EC2 Dashboard to view the new instance.
Log into AWS with your IAM credentials, and navigate to your EC2 Running Instances.

Note: Make sure you set the region appropriately from the menu in the upper right; otherwise, you won’t see the new instance. If you did not specify a region as part of
docker-machine create(with the optional--amazonec2-regionflag), then the region will be US East, which is the default. -
At the command terminal, run
docker-machine ls.$ docker-machine ls NAME ACTIVE DRIVER STATE URL SWARM DOCKER ERRORS aws-sandbox * amazonec2 Running tcp://52.90.113.128:2376 v1.10.0 default - virtualbox Running tcp://192.168.99.100:2376 v1.10.0-rc4 aws-sandbox - digitalocean Running tcp://104.131.43.236:2376 v1.9.1The new
aws-sandboxinstance is running, and it is the active host as indicated by the asterisk (*). When you create a new machine, your command shell automatically connects to it. If for some reason your new machine is not the active host, you’ll need to rundocker-machine env aws-sandbox, followed byeval $(docker-machine env aws-sandbox)to connect to it.
Step 3. Run Docker commands on the instance
-
Run some
docker-machinecommands to inspect the remote host. For example,docker-machine ip <machine>gets the host IP address anddocker-machine inspect <machine>lists all the details.$ docker-machine ip 192.168.99.100 $ docker-machine inspect aws-sandbox { "ConfigVersion": 3, "Driver": { "IPAddress": "52.90.113.128", "MachineName": "aws-sandbox", "SSHUser": "ubuntu", "SSHPort": 22, ... -
Verify Docker Engine is installed correctly by running
dockercommands.Start with something basic like
docker run hello-world, or for a more interesting test, run a Dockerized webserver on your new remote machine.In this example, the
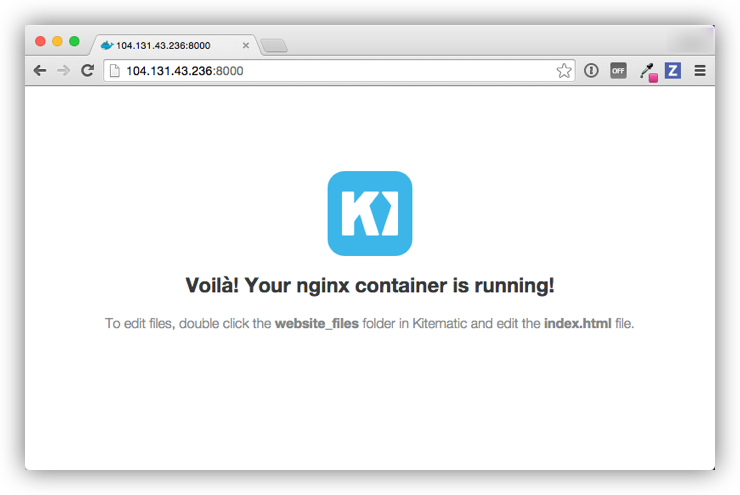
-poption is used to expose port 80 from thenginxcontainer and make it accessible on port8000of theaws-sandboxhost.$ docker run -d -p 8000:80 --name webserver kitematic/hello-world-nginx Unable to find image 'kitematic/hello-world-nginx:latest' locally latest: Pulling from kitematic/hello-world-nginx a285d7f063ea: Pull complete 2d7baf27389b: Pull complete ... Digest: sha256:ec0ca6dcb034916784c988b4f2432716e2e92b995ac606e080c7a54b52b87066 Status: Downloaded newer image for kitematic/hello-world-nginx:latest 942dfb4a0eaae75bf26c9785ade4ff47ceb2ec2a152be82b9d7960e8b5777e65In a web browser, go to
http://<host_ip>:8000to bring up the webserver home page. You got the<host_ip>from the output of thedocker-machine ip <machine>command you ran in a previous step. Use the port you exposed in thedocker runcommand.
Step 4. Use Machine to remove the instance
To remove an instance and all of its containers and images, first stop the machine, then use docker-machine rm:
  $ docker-machine stop aws-sandbox
  $ docker-machine rm aws-sandbox
  Do you really want to remove "aws-sandbox"? (y/n): y
  Successfully removed aws-sandbox ## Where to go next
- Understand Machine concepts
- Docker Machine driver reference
- Docker Machine subcommand reference
- Provision a Docker Swarm cluster with Docker Machine
 Feedback? Suggestions? Can't find something in the docs?
Edit this page ● Request docs changes ● Get support
Rate this page:
